Hi everyone,
I have a finely tuned Fedora 40 image that I cloned using Clonezilla (see: https://sh.itjust.works/post/25762756)
I wanted to deploy it on my old Acer Aspire 5737z but it won’t boot. It’s just displaying a — on a black screen for hours.
I’m not so knowledgeable but I guess it means I would have to reinstall the GRUB or whatever.
I’ve booted into my Fedora Live USB and tried the lsblk command people were talking about on the web (I don’t understand the terminal). Here’s the result.
I think the SDA disk is the one I would like to boot from.
Can anyone help me understand what I have to do 😇🙏
Hey there!
It sounds like you’re on the right track! The black screen with a dash usually means the bootloader (GRUB in this case) might need some love. So, you’ll likely need to reinstall GRUB on your old Acer.
Here’s a simple way to do it from your Fedora Live USB:
- Open a terminal (if it’s not already).
- Run
lsblkto confirm that your old Acer’s drive is/dev/sda. - Mount the Fedora partition with something like:
(Make suresudo mount /dev/sda1 /mnt/dev/sda1is the correct partition; adjust if needed). - Install GRUB by running:
sudo grub2-install --boot-directory=/mnt/boot /dev/sda - Then create a new GRUB config with:
sudo grub2-mkconfig -o /mnt/boot/grub2/grub.cfg - Reboot and fingers crossed, it should work!
It sounds a bit like magic (or some weird old ritual), but it should help your Acer find its way. Give it a shot! If it doesn’t work, let us know exactly what you see. We’ve got your back!
Take that as you will, but you sound like ChatGPT.
I get these vibes too, their other comment are in the same style.
Yep, the other comment is even more ChatGPT-ish. And the account was created today. Guess that’s a bot.


Thanks for the precise answer adapted to a rookie like me😇😅
Sadly it ain’t working. I guess the GRUB installing part which is problematic.
I’m doing my morning scroll before I start my day, so I can’t delve too deep, but this is the article I always reference when I have to do repairs
https://askubuntu.com/a/831241
#1 thing I noticed in your image is that lsblk only shows you partitions, and doesn’t mount them. You probably want /dev/sda3 mounted at /mnt
The only thing from the article you want to modify is using
mount -B /sys/firmware/efi/efivars /mnt/sys/efi/efivars, I believe the functionality changed since that article was written and that’s what worked for meAdditionally, if you drive is formatted as btrfs instead of ext4, once you mount your drive your root will most likely be at /mnt/admin or similar. Mount subdirectories to that folder instead of /mnt
If you have questions lmk and I’ll get back to you at some point today
Thanks for the help but I don’t understand anything from the message on askubuntu.
I’ve tried the sudo mount/dev/sda3 /mnt part though…
Sorry for my lack of terminal skills
That’s alright, I’ll do my best to walk you through it.
Your drive contains multiple partitions (/dev/sda1 through /dev/sda3).
One of these drives is going to be your EFI partition. This is what your system can read before linux boots, your BIOS can’t understand ext4 / btrfs / etc, but it can understand fat32.
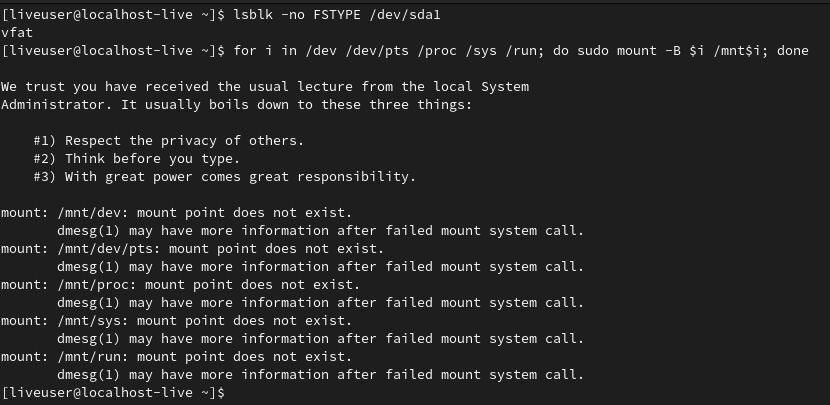
If you runlsblk -no FSTYPE /dev/sda1it should return vfat if that’s your EFI partition. That’s what we’re going to mount to /mnt/boot/efiI’m assuming that /dev/sda3 is your data partition, e.g. where your linux install is. You can find the filesystem format the same way as your EFI partition. Edit: After determining which partition is which, you’re going to want to mount the root partition, and then the EFI partition
mount /dev/sda3 /mnt
mount /dev/sda1 /mnt/boot/efiUnix systems have theology of “everything is a file”, all devices and system interfaces are mounted as files. As such, to be able to properly chroot into an offline install, we need to make binds from our running system to the offline system. That’s what’s achieved by running
for i in /dev /dev/pts /proc /sys /run; do sudo mount -B $i /mnt$i; done
This is just a simple loop that mounts /dev, /dev/pts, /proc, /sys, and /run to your offline install. You’re going to want to either add /sys/firmware/efi/efivars to that list, or mount it (with -B, which is shorthand for --bind, not a normal mount).Once you’ve done this, you should be able to successfully chroot into /mnt (or /mnt/root if running btrfs)
At this point, you should be able to run your grub repair commands.
Here is what I’m getting after running through the steps you kindly gave me. The second part is the part where I’m probably not doing right…
Apologies, I think I got a bit ahead of myself in the description.
Once you’ve determined which partition is which (in your case, /dev/sda1 does appear to be the EFI partition, and /dev/sda3 appears to be your root partition), you need to mount them in this ordermount /dev/sda3 /mnt
mount /dev/sda1 /mnt/boot/efiHere’s what I’m getting:

Could you send me the output of
lsblk -no FSTYPE /dev/sda3andll /mnt?Hi again. Here is what it gave me:

deleted by creator
Did you mount the partition to /mnt/sysimage before attempting to chroot it? You can use the ‘mount’ command to see what’s mounted where.


